Graphic Design 1 & 2
"The Christian should be the person who is alive, whose imagination absolutely boils, which moves, which produces something a bit different from God’s world because God made us to be creative." --Francis Shaeffer

This course will introduce students to basics of graphic design including creating infographics and gifs, learning the basics of logo design within advertising, typography, double exposure, and photo manipulation.
assignments
Intro to PHotoshop
|
Day 1 :: Use this video to help you learn the basics of Photoshop and become familiar with the interface.
|
|
Here is a gallery of random photos I had on my phone. You can use any of these to experiment with the functions you learn in this video.
Week ONe :: Intro to Photoshop
|
Day ONE
Watch the first video and work at your own pace today. Download one of the photos above (your choice) and make each change he suggests in the video to help familiarize yourself with where each function is on Photoshop. At the end of class, save your image as a .PFG to retain your layers. |
Day TWO through FIVE
Watch the other videos posted below and again...work at your own pace. The goal of this week is to get to know the functions. We are not aiming for great work yet. You can keep working on your first image or use any or all of the above images to keep experimenting with brushes, layers, functions. |
practice assignment
You can adjust as many images as you want this week as you practice, but by the end of the week, you should have ONE good image that has at least 5 of the changes listed below (this will be the graded image):
- Added text
- Heightened contrast of image
- Change color of an object within photo (using a filter counts here)
- Used the lasso tool to select part of the image to change or delete
- Added shadow to an object
- Overlay a pattern or color or gradient (to an object or text)
- Use blend mode to adjust two layers of object or text
- Use erase tool, stamp tool, and blur tool to erase part of an image
- Duplicate an object in the image
|
|
|
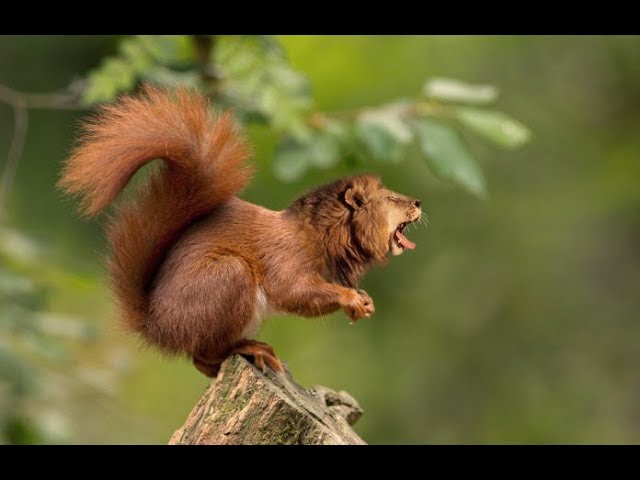
Assignment 2 :: Photo Manipulation Part I
Fantasy animals
For Part I of Photo Manipulation we will practice blending photos together by blending 2 images of animals together to create a fantasy animal.
You can search for pictures on Pexels.com or Unsplash.com [**make sure to give credit to your photographer]
Watch the videos provided all the way through before starting.
Then...
Use at least two pictures of DIFFERENT animals to create your own unique fantasy animal. Final images should be clean and blended appropriately so that the image looks seamless. It can have a background or a transparent background.
You will have the whole week to work on this project. If you have extra time, create a second one and turn in the best option.
|
Explanation of videos ::
The video to the right is more complex but he has a great explanation of selecting the photos you will need and talks you through the manipulation. --> The other two videos (below) are specifically blending two animals, which is the assignment, but they do not have talking. You will have to watch closely and probably pause and go back a few times to understand what they are doing. |
|
|
|
|
|
|
<<< Here is a helpful video on removing backgrounds if you choose to have no background for your fantasy animal assignment.
|
:: August 30-September 3 ::
|
Day ONE ::
Learn about KERNING Click on image to read linked article about "kerning" >>> Once you have read article... Visit the page linked at the header of this page titled "link to art games" Spend the rest of class playing Kern Type or working in Sketchbook on prompt |

|
|
Day TWO - FIVE ::
Work on your blended photo of fantasy animal. Once you are happy with the way both the foreground and the background look (keeping in mind the image should look clean...the line between the two images should not be visible) move on to the next part of the assignment--TEXT. |
|
Choose a quote from either a favorite book or something that might make sense in relation to your fantasy animal and work on adding text to your animal image.
Use what you learned about kerning at the start of the week to adjust any lettering issues. I have also attached two videos here that explain how to use kerning and tracking in Photoshop. >>> |
|
|
Vectoring ::
|
Start HERE ::
read this article https://www.adobe.com/creativecloud/design/discover/vector-file.html |
Continue learning ::
Watch the videos below to continue learning the difference between vector images and raster images and how to convert images into vector to help retain image quality as you resize. |
|
|
|
|
vector Practice ::
Choose an image on a free image site like pexels.com
Practice converting the image from raster to vecor. Do this at least 5 times.
Practice converting the image from raster to vecor. Do this at least 5 times.
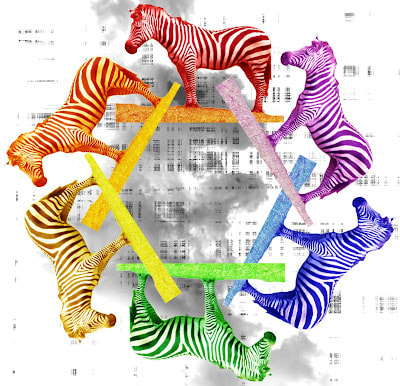
September 13 :: Photoshop color wheels
project from :: apexhsart.blogspot.com/2010/02/photoshop-color-wheels.html
|

|
Using what you have learned in Photoshop so far (Photo blending, deleting backgrounds, etc...), create a color wheel using a repeated image of your choice that has been re-colored.
The color wheel needs ::
The color wheel needs ::
- a separate background image that is black and white
- to consist of primary, secondary, and tertiary colors (so at least 12 colors)
|
|
|
